A regular user often deals with different types of errors while using Windows, like BSOD errors, system crashes, driver errors, and more. Although most Windows 10 problems can be fixed via troubleshooter utility, BSOD errors were tough to resolve. You also might need to access the crash dump file to fix the BSOD error.
What is System Error Memory Dump Files?
On Windows 10, whenever a critical error occurs like BSOD, the operating system creates memory dump files. These files were known as ‘Crash Dumps.’ The crash dump file of Windows 10 contains a copy of the system memory at the moment of the crash, allowing users to diagnose the problem later. The file is usually stored in the local system folder and gets overwritten automatically whenever the system encounters a BSOD. The memory dump file has information that can be very helpful to developers and IT admins. Also Read: Can My PC Run Windows 11? Here’s how to Check!
Remove System Error Memory Dump Files
If your PC has enough free storage left, leaving the Memory Dump files is best. However, if your PC runs short on storage space, you could delete those memory dump files to free up some space. Important: If your system gets many BSOD errors, don’t delete those files. They can help you troubleshoot the BSOD errors.
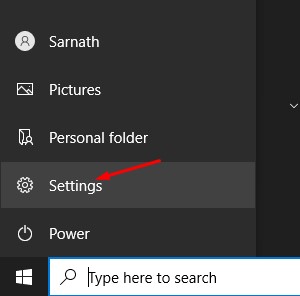
First, click on the Start button and select Settings.
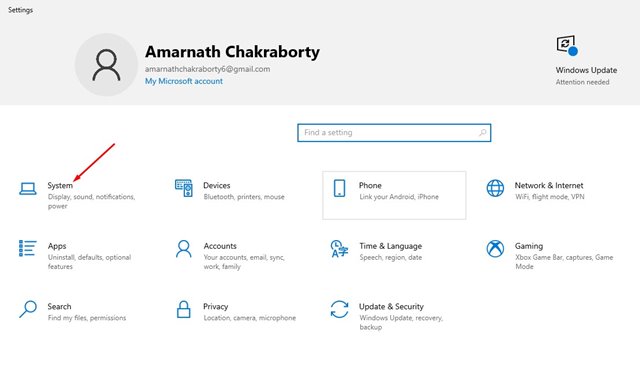
On the Settings page, click on the System option.
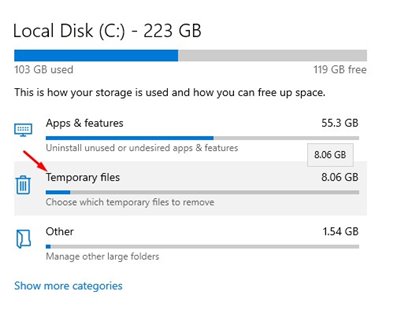
Click on the Storage option on the System page.
Click on the Temporary files option on the right pane.
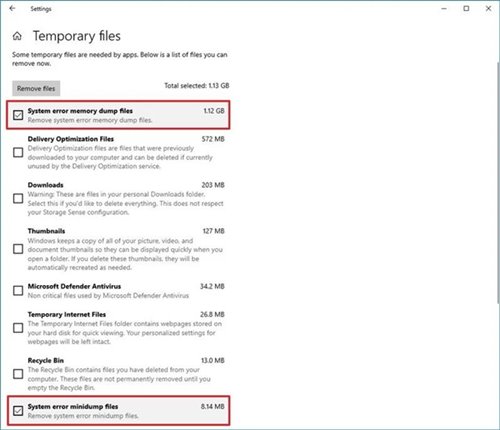
On the next page, check the System error memory dump files box and then click on the Remove button.
That’s it! You are done. This is how you can delete Windows 10 system error memory dump files.
Using Disk Cleanup Tool
Windows 10 also has a Disk Cleanup tool that scans and clears junk files from the PC. Here’s how to use the Disk Cleanup tool to delete System Error memory dump files.
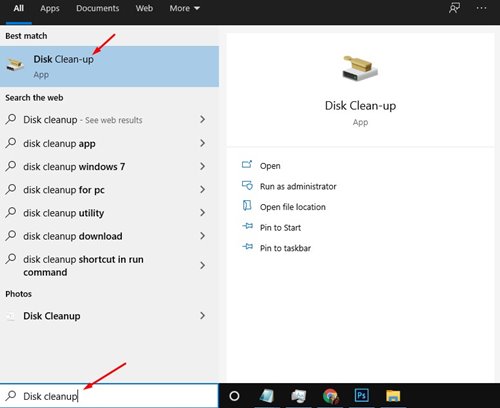
First, click on the Windows search and search for Disk Cleanup.
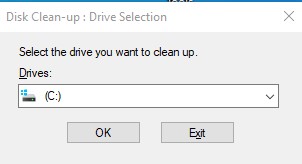
Open the Disk Cleanup utility from the list and choose your local drive. Once done, click on the Ok button.
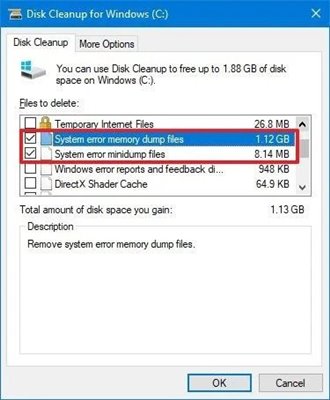
Check the System error memory dump files and System error minidump files on the Disk Cleanup utility. Next, click on the Ok button.
That’s it! You are done. This is how you can use the Disk Cleanup utility to clear System error memory dump files. Also read: How to Automatically Clean Windows of Unused Files So, this article is all about deleting the system error memory dump files to free up storage space. I hope this article helped you! Please share it with your friends also. If you have any doubts about this, let us know in the comment box below.